How to install a Vinyl Floor
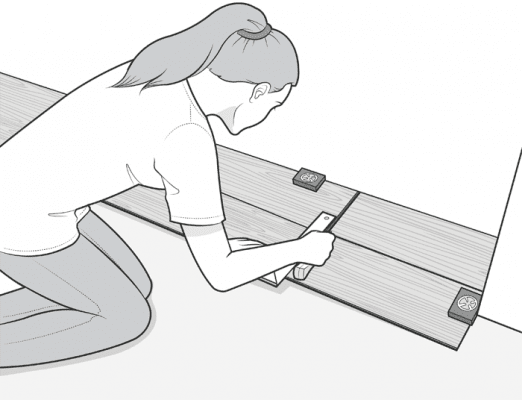

Learn how to install a vinyl floor with our handy How-To Guide.

A vinyl floor will transform your home and bring you years of pleasure.

To make the most of your purchase, however, you must understand how to install the product properly.

If you do not install your floor properly, the guarantee will be void. To help, we have created a concise step-by-step guide. Please note this is specifically for our Clever Click Waterproof flooring products.


Pre-Installation Considerations

The following is a list of pre-installation considerations and requirements:

  •  Clever Click Flooring can be installed on concrete, timber and Stone
  • It can also be installed on subflooring with suitable preparation
  • The installation site must comply with relevant building and safety regulations
  • Clever Click Flooring should NOT be installed externally - Clever Click Flooring can be used in conjunction with under-floor heating

Preparation

Before installation, the floor area must be adequately prepared. The following is a pre-installation checklist you should complete before commencing installation:

1. The room has a temperature of between 18C/62F and 27C/80F.
2. Floor panels have been checked for defects and colour difference.
3. Floor panel tongue and groove have been checked for dirt and damage.
4. Floor panel packs have been mixed to ensure varying patterns


5. Old floor surface has been cleaned and made smooth/free from contamination


6. Check all floor panels are from the same batch number for consistency


Fitting Process

The main point to remember is that this is a “floating floor” system. Under no circumstances should the panels be glued or fixed to the old floor surface.

Should I use an expansion joint filler?

Joint Filler should only be used in the following circumstances:

1. For floor areas larger than 50m2.
2. In rooms where heat expansion could occur (conservatories for example).
3. In rooms where at least one wall is longer than 10m.
 If a joint filler is required, a 5mm expansion joint should be applied around each wall of the room. This will create a smooth finish, and allow the flooring system to move when expanding.

Step by step fitting process


tools you need for installing vinyl floor

Recommended Tools

  • Sweeping Brush
  • Vacuum Cleaner
  • Pencil
  • Utility Knife
  • Rubber Mallet
  • Tapping Block
  • Set Square
  • Rule
  • Supplied spacers
  • Roller
preparing the surface before you lay a vinyl floor

1. Prepare the floor

Make sure it's clean and free from contamination.

checking batch numbers of vinyl floor

2. Check that all the panels are from the same batch number

There may be slight colour variations between different batches.

cutting a vinyl floor

3. Measuring – Determine the dimensions of the floor space.

Work out if the first row of panels needs to be cut down. If so, trim them down to size using your utility knife. If not, remove the lower groove lip of the first row of panels using your utility knife (this will ensure the panels fit flush to the wall).

laying a vinyl floor

4. Lay the first row – Starting from the wall, lay the first row of panels. Lay the first panel in the corner of the floor space, and work from left to right.

  • Lay a panel and then click the next panel into place using the tongue and groove
  • Use your rubber mallet to ensure the panels are joined together
  • Continue this process until you reach the end of the row
  • Before laying the last panel in a row, measure it to check if it needs trimming down            
  • Trim the tongue from the end panel and lay it in position

laying a vinyl floor

5. If your room is larger than 50m2, or prone to heat expansion:

Use the spacers to create a gap of 5mm in rooms where heat expansion could occur, such as conservatories.

laying a vinyl floor

6. Lay subsequent rows – Once the first row is complete, you can move onto the second and third rows etc. 

The process remains the same barring a few small differences:.

  • For the first panel on the second row, use the leftover cut piece from the previous row – this gives a natural staggered finish.
  • Fit the second row by tilting the panels at a 25-degree angle and slotting into the previous rows tongue.
laying a vinyl floor

7. Use a mallet to secure

After the first panel of the second row, you must fit the subsequent panels into both the previouspanel of the row and the previous row. Ensure to continue using a mallet to secure the joins.

laying a vinyl floor

8. Follow this procedure to lay the rest of the floor

cutting a vinyl floor

9. About Cutting

Vinyl floor tiles can be easily cut using a sharp Stanley blade or utility knife. First score the panel and use a ruler to ensure a straight line. .

snapping apart a vinyl floor after cutting

10. Once the panel is scored with the knife it can be snapped apart.

how to cut a vinyl floor

11. Fixtures

The only other consideration is cutting out fixtures. For example, if your floor space contains a radiator – you must cut your floor panels to suit the pipes. The process to do this is simple:

  1. Place the floor panel next to the fixture.
  2. Draw the fixture placement on the floor panel.
  3. Cut out the fixture outline on the panel.
  4. Lay and fit the panel into place.

For complex cut-outs - you may need to use a jigsaw. If you try and cut these by hand, the end result could be unsightly and harm the overall finish of your floor.

As you can see the process is straightforward. Why not check out our YouTube video for a visual guide to this installation process.

If you follow this guide, your Clever Click floor can be installed within an hour. Remember to take care and measure twice for the best results!

Aftercare and Maintenance

The hard work is not quite finished. A Clever Click floor must be maintained.

Ideally, the floor should be swept and mopped every day. The following are some general maintenance tasks you should undertake to sustain the quality of your floor:

  • Daily cleaning routine 
  • Pick up any litter 
  • Remove debris and dust with a vacuum 
  • Sweep floor with a soft bristle brush

Preventative maintenance 

  • Use doormats to prevent tailing of dirt onto floor
  • Place felt squares under furniture legs to prevent damage
  • Mop the floor once a week
  • Try to minimize sunlight exposure

By adhering to these guidelines, your Clever Click floor will retain its quality for years to come!